Building and Deploying my Hugo Site with GitHub Actions
Introduction
The great Carl Sagan once said: “If you wish to make an apple pie from scratch, you must first invent the universe.” There is not much I would dare to say is common between Carl Sagan and this little blog. However, that quote is very apt for how it came about.
I have always meant to have somewhere I could post various musings, articles and technical details. I have had a few short-lived or failed attempts at this is the past. This is the latest incarnation and I think it has a better than even chance of survival. In this post I discuss why and detail how it works and is deployed.
Note: This is not a step-by-step walkthrough. I hope it is a good resource for people doing similar things as me, but it assumes some background knowledge of Git and GitHub at least. If you have any questions, feel free to hit me up on Twitter @jg_andrews
TL;DR - If you are mainly interested in how to build and deploy using Github Actions, there is a lot of information about doing that in the last few sections. Feel free to skip ahead!
Self Hosting
I like to self host my blog so that I have complete freedom over the content and the presentation. Being more of a techie than a blogger, I also like to tinker with the tools. So despite the downside of having to maintain the infrastructure and software I enjoy self hosting.
However this is also one of the reasons my blogs to date have been short lived. This is mainly for a few key reasons:
Blogging engines are often a pain to maintain and require updating which can easily mess up your content and kill your blog
Blogging engines often require a lot of extra software like databases, scripting engines and come with lots of dependencies to manage and keep consistent
Many engines have their own custom editing tools that are great, but aren’t flexible when it comes to offline editing or content management outside of the blogging engine. I know there are solutions to this and its a minor quibble but its always been a barrier for me personally. Either having to find an editing tool that supports my engine of choice or having to use the tools provided by the engine itself.
I worry about portability, backups and security when using a fancy blog engine or Content Management System (CMS). Yet another hassle.
In short my previous attempts failed because they ended up being hard to maintain and hard to update. You end up spending more time nursing the infrastructure than writing content. I would enjoy the process of setting them up, but ultimately get frustrated with maintaining them and just give up. This is obviously on me for insisting on self hosting and running the software myself. But as I said, it is important to me that I have control over my content and the platform.
A New Start - My Criteria
When I set out to create a new blog I had some basic criteria in mind:
Self hosted (see above). I have had a place to host my blog for years so that one is solved
Little to no external dependencies and supporting software
Source control for the content
Editing from anywhere in a text editor of my choice using simple markup i.e. markdown
Themeable. I want a clean and basic look but I don’t want my blog to look like a cookie cutter copy of someone else’s
Simple automated, continuous deployment style deployment of content. I never wanted to have to manually rysnc files about or cut and paste from my editor into the blog editor
Easy to secure and keep secure
In my mind I had to solve all of this before I could write a single line of content. I had many ideas for articles but I was blocked until I completed the “invent the universe” part. This is fine, except that it seemed like a lot of work and I kept putting it off!
Luckily most of the criteria were met by some very good software and tooling. The rest of this article describes what this is and how it all hangs together and results in the blog you are reading now.
Static Site Generators
Static site generators are not new. I have known about them for a long time. They pre-generate your entire site up front so the content can be hosted as static HTML as opposed to served dynamically each time a user hits your site.
I am not going to define them further, there are several excellent sites that do a better job. Such as the David Walsh Blog post on this very topic.
Needless to say there are huge benefits to static generation. Firstly you don’t need any supporting software like databases and other dependencies. Secondly they are more secure because they are simply static HTML files served by a web server. There is no database or complex CMS to attack. They are very fast, they are cache friendly and, finally, they make using version control for content very straight forward.
Using a static site generator meets most of my criteria above. The only negative I see is that they come with a bit more complexity in terms of getting to grips with how to publish and manage the content and site. Which is not great for non-techies and is another reason to procrastinate for me!
There is no nice CMS system to manage publishing and there are no nice custom editing tools. This second point didn’t bother me, in fact it is a positive. However getting to grips with using a static site generator did.
I tried a whole bunch of different static site generators. There are tons of them. Here for example is Netlify’s list of thier top 10. None the ones I tried felt quite right for me or didn’t gel. Then I tried Hugo and I finally figured this static site thing out.
Hugo
Hugo is a static site generator written in Go. Consequently releases ship as a single binary and there is support for every major platform.
Hugo has a very good quick start guide which gets you up and running really quickly and able to create a site from scratch in about 10 minutes. This enabled me to quickly play around and get familiar with all the components and how it hangs together.
The single binary, multi platform feature also turns out to be really important for me. I didn’t really get this at the start of my journey because I assumed I would be deploying and publishing my blog on the hosting server itself. It’s obvious to me now, but there is no need for that. My hosting server doesn’t have Hugo on it at all.
Hugo runs on the iMac and/or MacBook where I write all of this content. I can create posts, run Hugo to generate my site, then deploy it as static HTML.
To help with previewing content, structuring your site and tinkering, the Hugo application also provides a simple web server that allows you to run your site locally to see how the content is presented and make sure everything looks right before publishing to your live site. One aspect of this that I didn’t realise at first is that you can use this local server to live preview posts as you write them. Hugo monitors the content location of the site and live reloads the site on each new save and doesn’t require a manual browser page refresh. It’s all very slick. This means you can check how your post looks as you write it. All this without needing to install a web server to host the content and all using the single Hugo binary.
Hugo has theme support with a huge number of themes created by designers and users available. Theme installation is easy and is covered in the quick start.
I know how to use less than 1% of the features and capabilities Hugo has. It is hugely customisable with a rich templating system, lots of flexibility in content management and myriad other features that enable you to customise your site in any way imaginable.
For me at the moment, simply using a basic theme and pretty much the out of the box content management features is enough. As I get more familiar with it I will delve further into the feature set. Luckily there is great documentation, an active community and a large user base. So finding help and examples is not hard.
Content Creation
Like most static site generators, Hugo supports Markdown as the markup language for content. This is great because it means all my content sits in standard text files that are easily readable outside of the site and are simple to write in any text editor (check another criteria off!).
All of my posts are generally a single markdown file written on my Mac using one or more of the following tools:
Visual Studio Code - Microsoft’s most awesome tool ever. VS Code is a highly flexibly multiple language development environment and text editor
Sublime Edit - A super clean and super fast general purpose text editor
iA Writer - A clean and nice markdown friendly writing tool with a core principle distraction free writing. iA Writer also runs on the iPad allowing me to use a consistent tool across my Mac and iPad for writing. Which is great.
Source Control - Git and GitHub
As stated above, one of my primary goals was to use source control to track updates, backup and store the source and content of my site. For me and most people these days this means using Git.
I use Git for all of my dev projects and even though I am no guru, I know my way around it well enough that it is no chore to use. The big benefit of using Git is that you can use GitHub as a remote source to securely store your content. My entire Hugo site gets checked into git locally and pushed up to GitHub for safe keeping and automatic deployment (see below). This means I have copies of my content in multiple places and can access it from anywhere.
Despite many doomsayers predicting that with Microsoft buying GitHub it would spell the end of the open community and deal a blow to open source software, GitHub has continued to flourish. Microsoft have opened up GitHub to even more personal use cases by allowing private repositories to be hosted for free now.
I wouldn’t have minded hosting my blog site publicly on GitHub, all the content is public on the blog anyway. However there is some peace of mind in the fact that I can make it a private repository to allow me to push draft content prior to deployment and not have prying eyes getting a sneak preview of my massively popular(!) blog. I was planning on paying for GitHub to allow me to get the private repository support, but Microsoft made it free in time for me to not have to. Which was nice!
As noted above, a static site is perfect for storing content in source control. Everything is static and lives nicely and complelely in a Git repository.
Here are the basic high-level steps for creating a Hugo site and storing it on GitHub using git:
Note: This is not a blow by blow account of each command, but a high-level overview. I assume the reader is familiar with Git and GitHub at least in principle.
- Create a git repository. If I intend on using GitHub, I like to do this on GitHub first and pull the repo to my machine as it sets up the remote source easily at the start.
git pull <repo name>
Note: This assumes you have setup all your GitHub auth and ssh config
Create your Hugo site:
hugo new site <site name>Customise your site with a theme and any other customisations in
config.tomlAdd some content - This lives under the
contentdirectory within your site. You can use the Hugo command to generate a new skeleton for a post by running the following in the root directory for your site:or just create it manually yourself once you are familiar with the format for the post meta data within the front matterhugo new posts/my-post.mdAdd everything to the repo and commit your changes.
git add *
git commit -am "First Commit!"
Push your changes to GitHub.
git pushRepeat from step 4 when adding more content
As you add content you can preview your content by starting the built-in Hugo web server and telling it to render drafts:
hugo server -D This starts a web server on port 1313 bound to the local host address by default. You can see your site by browsing to: http://localhost:1313
Note the -D flag. In the front matter for your posts you can flag a post as draft by setting the draft: true property . This means that, unless told to, Hugo will not render this content when you generate the static content. In this way you can commit draft material to git without having it appear in the final render. When you are ready to publish change the draft property to false and Hugo will go ahead and render the content.
At this point you have a Hugo site checked into GitHub. Nothing has been published and no content is ready to be served by a web server as yet.
Build and Deploy Options
There are many places you can host and deploy a Hugo site easily. The Hugo site lists a number of good options. As I have said, I want to host it on my own server. This may change in the future, but when I relaunched this version of my blog I wanted to figure out how to easily self host and update a static site and I already had a place to put it.
The problem I had was deploying it easily. When you are ready to deploy your site, you need to run the hugo command in the root of your site. It will then generate the structure and HTML pages for your site and output them to the public directory. This is the static content that the web server will serve.
It is easy to write a simple publish script that generates the site and rsync’s it all to the server. However I wanted my site to get sent to my server every time I checked my content into GitHub. Initially I thought I could a just add a git commit and git push command to my publish script and be done. But I really wanted the publish to be triggered by the git checkin. I wanted the whole process to be triggered by git push. Like with a proper Continuous Integration/Continuous Deployment (CI/CD) system.
My first idea was to have a watcher on my server that pulled the repo on each commit. There are many ways to do this, but I didn’t like the idea of having something outside of my Git workflow that would have to pull ALL the source, then build the site, then copy the HTML into the web server document location. I didn’t like the idea of something polling for changes. I wanted changes to be pushed from GitHub rather than pulled from the server.
I discovered that this is very much possible using GitHub’s built-in CI/CD system: GitHub Actions
GitHub Actions - CI/CD
GitHub actions are workflows that are triggered when an event happens in your repository. This is exactly what I wanted, however I didn’t quite understand the mechanics when I first looked at them. I assumed they would only worked for deploying to Github Pages or other big hosting providers who support actions.
I also didn’t see how the build process could possibly work. Did I need to have an agent on my server that GitHub calls when a commit happens? On reading the documentation I discovered that actions are run on things called runners and GitHub can provided them for you.
A runner is an ephemeral virtual machine that is spun up on demand and runs your CI/CD process. GitHub provides the runner for free for up to 2000 minutes per month for a single runner on a private repository. A single runner is completely free for public repositories. Which quite frankly is amazing value. You can use Windows, Mac and Linux runners depending on your needs. There are paid tiers that grant more minutes and you can pay per use for additional runners. Alternatively you can self host a runner for free.
To create Action. Browse to the Actions tab on your GitHub repository:

From here you can click the New Workflow button and you will be presented with a plethora of pre-built workflows. You can choose one if that suits your needs. There are a ton of user created workflows as well as workflows for deploying to AWS, Google and all manner of other providers. There are CI workflows and custom deployment workflows. These allow you to build up a workflow to suit your needs.I wanted to start from scratch so I choose the ‘Skip this and set up a workflow yourself’ option.
This adds a .github/workflows directory to your repository and adds a yaml file that defines your workflow.
The structure of the workflow file is relatively easy to follow. Below is the one used to build and deploy this site.
Notice it uses an action built by another user in the build step to setup hugo on the runner and execute the build. This is the great thing about actions, you can compose more complex workflows from actions already built by others. This means a lot of donkey work can be avoided if some other kind soul has already done it and shared it.
The last step in the workflow is the deploy step which transfers the site to my server. Notice this uses a deploy script and some data injected from the repo’s secret store. This is discussed in more detail below.
name: build and deploy jgandrews.com

# The trigger for the action
on:
  push:
    branches:
    - master

# Jobs are contains steps
jobs:
  build_deploy:
    name: build and deploy
    # This job runs on linux
    runs-on: ubuntu-latest

    steps:
    # The first step is provided by GitHub and it checks out
    # the master branch on the runner
    - uses: actions/checkout@master
      with:
        submodules: true

    # This step uses an action created by a user which sets
    # up Hugo on the runner and runs the hugo command to build
    # the site
    - name: Setup Hugo
      uses: peaceiris/actions-hugo@v2
      with:
          hugo-version: '0.62.2'

    - name: Build
      run: hugo --minify

	  # The last step deploys the site to my server by running
	  # the deploy script located in the ci directory
	  # within the repo
    - name: deploy
      run: source $GITHUB_WORKSPACE/ci/deploy.sh
      env:
	      # This section sets up the environment used by the
	      # deploy script. These values are injected from
	      # the repo's secret store
        ACTIONS_DEPLOY_KEY: ${{ secrets.BDEPLOY_KEY }}
        SSH_USERNAME: ${{ secrets.SSH_USER }}
        SERVER_ADDRESS: ${{ secrets.SSH_SERVER }}
        SERVER_DESTINATION: ${{ secrets.DEST_DIR }}
        SSH_PORT: ${{ secrets.SSH_PORT }}
When you try find examples of deploying to a self hosted server there aren’t many to find. Most examples show how to deploy to Github Pages, which is not what I wanted to do. I managed to find an example for how to deploy to your own server on Harsh Shandilya’s blog and I used this as the basis for my workflow and the deploy script which I will discuss below. Hopefully by creating another article about this, people will have another place to find this information.
The last step does the actual deploy to my server. Notice it uses data pushed into environment variables from the repo’s secrets store.
Secrets
Every GitHub repository has a secrets store. You can get to it via the Settings screen on your repo:
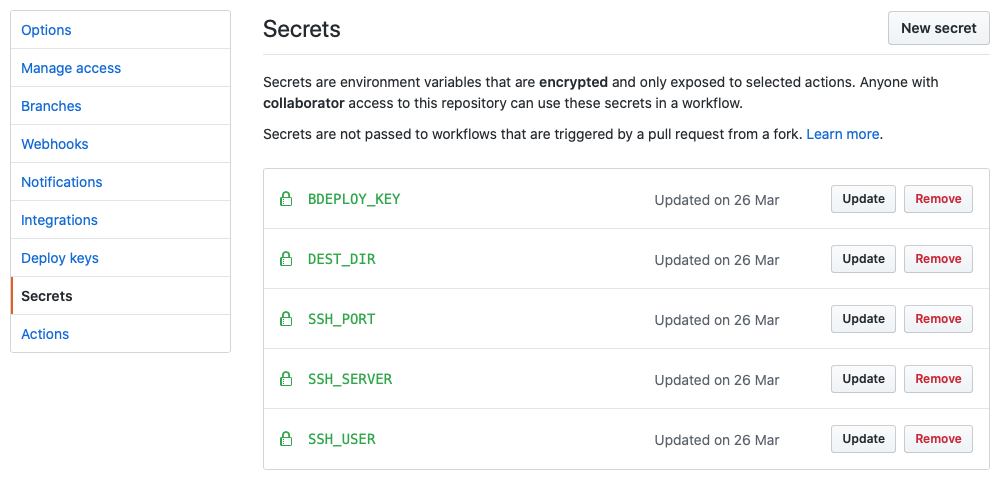
In the repositories secrets store you can add data that needs to be encrypted and remain private and unreadable. Anything can be added here, but generally its things like auth credentials, API keys etc (I’ll have more to say about secrets in another post).
Once you add a secret here it can never be viewed or used outside of an action. Github even automatically redacts secrets inside of the logs of the runner so that they won’t leak. It doesn’t prevent a user from outputting them to custom logs or other output though so you need to be careful who can control your workflows.
You can see, above, from the workflow file and the secrets store image how secrets are defined and injected into the environment.
You can also see that I am using ssh to transfer the site data to my server. There are a number of ssh actions available from the actions marketplace, however I am very paranoid about these sorts of things and even though I could inspect the source of the pre-built ssh actions I really didn’t want to use one. I can easily see a bad ssh action reading my secrets and sending them somewhere for later use! This was another reason I liked the approach I found on Harsh Shandilya’s blog which was to build the ssh transfer part manually. This is done in the deploy.sh script
Deployment
The deploy.sh script is run in the final step. It takes the output created after hugo generates the site and copies it via rsync over ssh to my server:
#!/usr/bin/env sh

# Create the .ssh directory on the runner. Used to store
# the ssh key for authentication
export SSHDIR="$HOME/.ssh"
mkdir -p "$SSHDIR"

# Copy the ssh key from the secrets store into the .ssh directory
# and assign the correct permissions
echo "$ACTIONS_DEPLOY_KEY" > "$SSHDIR/key"
chmod 600 "$SSHDIR/key"

# Setup a variable to pass to ssh for the connection to the server
export SERVER_DEPLOY_STRING="$SSH_USERNAME@$SERVER_ADDRESS:$SERVER_DESTINATION"

# Change to the public directory and rsync everything to the
# documents location for the web server on my server
cd "$GITHUB_WORKSPACE/public" || exit 1
rsync -hvcr --progress --delete --no-o --no-g -e "ssh -i $SSHDIR/key -o StrictHostKeyChecking=no -p $SSH_PORT" . "$SERVER_DEPLOY_STRING"
This is almost a direct copy from Harsh Shandilya’s repo. I can’t claim much authorship here. The comments are mine.
The deploy script is located in the ci directory within the repo and is pulled to the runner with the rest of the site source when the checkout is done. Notice no secrets are exposed in the deploy script, they are all accessed via the environment variables setup by the workflow.
Public key auth is used to login to the server and the key is passed to the runner from the secrets store. I have a specific identity setup for the Github Action which can only do this one task on my server. The server is also locked down to only accept public key auth for ssh connections.
My server runs a standard nginx web server with a very basic config that serves only my site. At a later date I will probably swap this out for Caddy and when I do, I will write it up here!
Now we are done!
Conclusion
And finally, we have invented the universe! A fully automated git based deployment of a Hugo site to a self hosted server. Every time I do a git push on my site repository it triggers the workflow on GitHub which builds with Hugo and deploys via ssh.
I can now easily add content to my site with a single command. Writing articles is easy using the editor of my choice and I have fully redundant copies of my site in a distributed version control system. It turned out to be relatively easy to achieve and opened my eyes to Github Actions as a means to automate things on GitHub.
It’s a constant marvel what you can now do with a bunch of open source software and free online services.